MiniTool Partition Wizard 8.1.1 - Server partition magic
- Convert NTFS to FAT.
- GPT Disk and MBR Disk interconversion.
- Copy Dynamic disk volume.
- Copy UEFI boot disk.
- Convert GPT-style Dynamic Disk to Basic.
- Move Boot/System volume for Dynamic Disk.
- Fully support UEFI boot.
Partition Wizard Server Edition 8.1.1

5% OFF!
Price: $129Hot Price: $122.55Server Partition Magic software - MiniTool Partition Wizard Server Edition. MiniTool Partition Wizard Server Edition is a server partition manager software as Partition Magic. MiniTool Partition Wizard Server Edition has efficient and safe disk ...
Server Partition Magic Resources
Server Partition Magic
Partition Magic For Server
- Configure Windows 10 to protect privacy
- back up Wndows 10
- Reinstall Windows 10 without Losing Data
- Back up System Files to Recovery Drive
- System Restore Fails with No Disk
- Windows Server 2019
- Automatic File Backup
- Steam Disk Write Error
- Speed up Windows 10
- File Record Segment Is Unreadable
- partition magic 8 server 2003
- partition magic 8 windows server 2003
- partition magic for 2003
- partition magic for windows 2000 server
- Partition magic for server 2000
- Partition magic for server 2003
- Partition magic for server 2008
- Partition magic server
- Partition magic server 2000
How Do I Upgrade Hard Drive
Computers are widely used in our lifetime. We use them to work, to store data, to enjoy entertainment, and so on. But hard drive may run out of space as time goes by. Then, it’s time to upgrade the old hard drive to a larger one. People will ask: “How do I upgrade hard drive in a very easy way? It will take so long a time to copy so many files to another hard disk.” Fortunately, technicians design some partition management software to solve this kind of problem. MiniTool Partition Wizard is one outstanding representative.
MiniTool Partition Wizard has many functions, and users can visit its website to learn more about it. Here, we recommend its function “Copy Disk” to solve the upper problem. At first, we think users should know the effect of “Copy Disk”. It can copy all partitions and data from the specified disk to the target one and the copies can be used normally. All in all, it can help people to:
1) Upgrade hard drive to a large one.
2) Make a backup of important disk content to avoid accidental damage.
3) Copy data to another disk to replace an old disk.
How to Copy Disk
Take Windows Server 2008 as an example, user wants to copy disk 3 to disk 2.
User should purchase MiniTool Partition Wizard Server Edition first (Purchase Now), and install it in computer. Moreover, if the target disk has important information in it, user should make a backup first, for “Copy Disk” will delete all content in target disk.
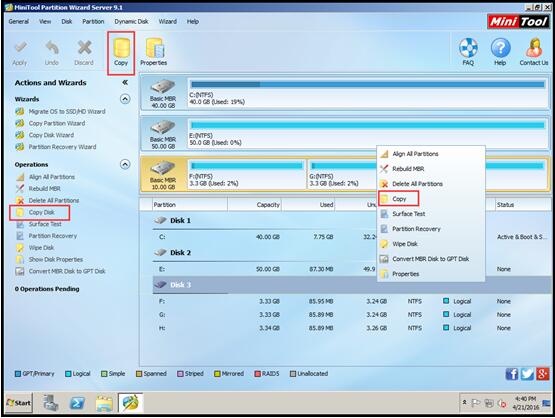
Step 1. Run MiniTool Partition Wizard Server Edition and get its main interface. Then select disk 3, and click “Copy” from the right click menu.

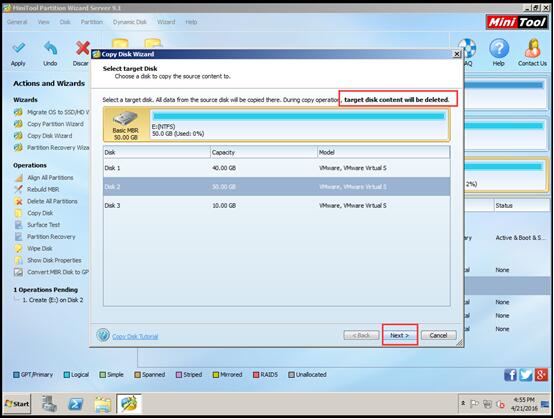
Step 2. This interface prompts “target disk content will be deleted”. Users should make sure that they have made a backup of the disk and press “Next” to continue.

Step 3. There are three copy options in this interface. Users can choose the one he needs, and press “Next” to continue.

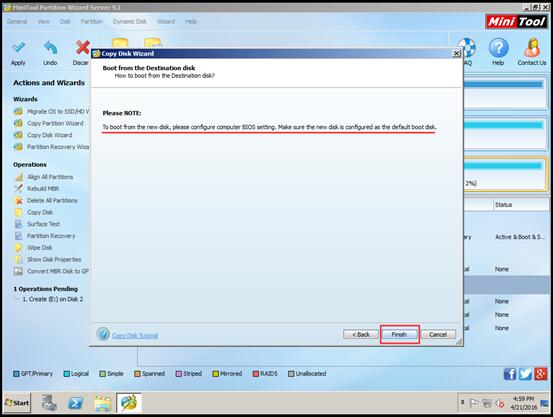
Step 4. Please refer to the note in this interface to know how to boot from the destination disk. Then click “Finish”, and back to the main interface.

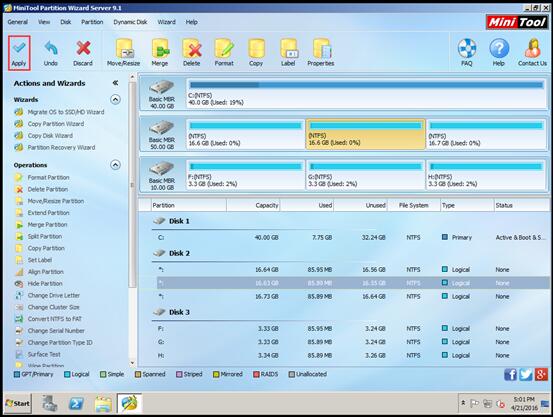
Step 5. Then users will see the copy result preview. But they still need to press “Apply” to save the changes.

The data of disk 3 is copied to disk 2 successfully, and user can use the copied data directly.
If the source disk is system disk, we think it’s better to use the function “Migrate OS to SSD/HD”, which is specially designed to migrate operation system, and then use the function “Copy Partition” to copy the rest data partitions to the target partitions.
Common problems related to partition magic and our solutions:
- Home
- |
- Buy Now
- |
- Download
- |
- Support
- |
- Contact us


