MiniTool Partition Wizard 8.1.1 - Server partition magic
- Convert NTFS to FAT.
- GPT Disk and MBR Disk interconversion.
- Copy Dynamic disk volume.
- Copy UEFI boot disk.
- Convert GPT-style Dynamic Disk to Basic.
- Move Boot/System volume for Dynamic Disk.
- Fully support UEFI boot.
Partition Wizard Server Edition 8.1.1

5% OFF!
Price: $129Hot Price: $122.55Server Partition Magic software - MiniTool Partition Wizard Server Edition. MiniTool Partition Wizard Server Edition is a server partition manager software as Partition Magic. MiniTool Partition Wizard Server Edition has efficient and safe disk ...
Server Partition Magic Resources
Server Partition Magic
Partition Magic For Server
- Configure Windows 10 to protect privacy
- back up Wndows 10
- Reinstall Windows 10 without Losing Data
- Back up System Files to Recovery Drive
- System Restore Fails with No Disk
- Windows Server 2019
- Automatic File Backup
- Steam Disk Write Error
- Speed up Windows 10
- File Record Segment Is Unreadable
- partition magic 8 server 2003
- partition magic 8 windows server 2003
- partition magic for 2003
- partition magic for windows 2000 server
- Partition magic for server 2000
- Partition magic for server 2003
- Partition magic for server 2008
- Partition magic server
- Partition magic server 2000
How to Extend Partition
I have received a low disk space message for Drive C. I deleted the F partition that was unused and empty containing about 2.5GB. How can I add that to the C Drive? I thought deleting the F partition will automatically direct those Giga Bytes to the C Drive. The deleted F drive just sits there with the message “Unallocated” still indicating 2.5GBs.
Source: askbobrankin

The upper issue is a common phenomenon. I believe that many users have received that kind of warning. The next, I will introduce that what is low disk space warning, and how to extend partition to eliminate that warning.
Why There Is Low Disk Space Warning
When a hard drive partition is low on free space, you will get a pop-out balloon warning in the System Tray alerting you that the computer is running low, or is out of, disk space, as the thresholds are approached. These thresholds are 200MB, 80MB, and 50MB respectively by default. That is to say, when the free space of the hard drive is smaller than 200MB, Windows will give the low disk space warning every now and then. This is really super annoying.

How to Extend Partition
Extend Partition by Deleting Files or Using Disk Management
Take me for instance.
Years ago, when I first received that warning, I chose to delete some large size but useless files from the hard drive. But I still need to store my work and personal data in my computer and with time goes by, the hard drive free space is smaller and smaller. Soon, that warning appeared again. Deleting files is not really a good and effective solution.
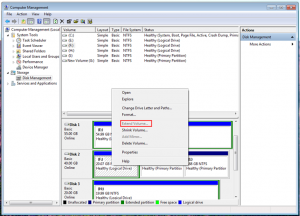
Then I realized that I could use disk management to get more space from another partition. But it’s not a smooth process. Just like the issue raised at the beginning of this post, the unallocated space will not be merged into the target partition automatically. To avoid convert basic disk to dynamic disk, extending primary partition was only available when there was contiguous unallocated space behind it, and extending logical partition just could borrow space from contiguous free space behind it. If there’s no unallocated space or free space in computer, the function “Extend Volume” is greyed out. Besides, extending partition in disk management is designed for NTFS and RAW partition. It’s impossible to extend FAT partition. There were so many limitations.

So deleting files and extending partition by using disk management are not the ideal methods. But, third party partition management software can break these limitations. Here, I introduce a piece of extending partition freeware to you all. It is MiniTool Partition Wizard, a piece of professional partition software, which can be used to extend partition, move/resize partition, migrate OS to a new disk, and more. The following are the exact steps to extend partition by using it.
How to Extend Partition Using MiniTool Partition Wizard
Take partition F: as an example.
Download and install MiniTool Partition Wizard on computer firstly.
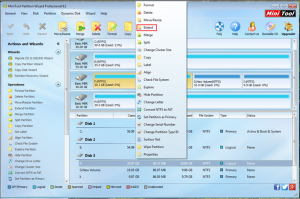
Step 1. Launch MiniTool Partition Wizard, and get its main interface. Then, select partition F:, and press “Extend” from the right-click menu.

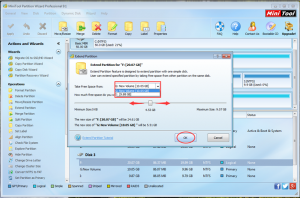
Step 2. Choose the partition and change the space size you want to take free space from in this interface, and press “OK” to continue.

Step3. Press “Apply” to save the changes.
See, this is really easy to extending partition by virtue of MiniTool Partition Wizard. If you encounter low disk space warning and don’t know how to extend partition fast and effectively, you can also refer to 3 Ways to Help You Get out of Low Disk Space Warning in Windows 7/8.1/10 to know more relative knowledge.
If you are using Windows Server, you should purchase MiniTool Partition Wizard Server Edition for your use.
Common problems related to partition magic and our solutions:
- How to Enlarge Windows System Partition without Data Loss
- Extend Partition in Windows Server by MiniTool Partition Wizard
- Three Ways to Enlarge Partition to Avoid Low Disk Space Warning
- Question: Once when I’ve installed Win7, I’ve divided my HD to several partitions. Unfortunately I gave only 50 GB to drive C. Now I would like to extend it, but I can’t extend partition for extend volume is in grey. Is there anything I can do in order to extend partitions? (From: Windows SevenForums) […]
- Home
- |
- Buy Now
- |
- Download
- |
- Support
- |
- Contact us


