MiniTool Partition Wizard 8.1.1 - Server partition magic
- Convert NTFS to FAT.
- GPT Disk and MBR Disk interconversion.
- Copy Dynamic disk volume.
- Copy UEFI boot disk.
- Convert GPT-style Dynamic Disk to Basic.
- Move Boot/System volume for Dynamic Disk.
- Fully support UEFI boot.
Partition Wizard Server Edition 8.1.1

5% OFF!
Price: $129Hot Price: $122.55Server Partition Magic software - MiniTool Partition Wizard Server Edition. MiniTool Partition Wizard Server Edition is a server partition manager software as Partition Magic. MiniTool Partition Wizard Server Edition has efficient and safe disk ...
Server Partition Magic Resources
Server Partition Magic
Partition Magic For Server
- Configure Windows 10 to protect privacy
- back up Wndows 10
- Reinstall Windows 10 without Losing Data
- Back up System Files to Recovery Drive
- System Restore Fails with No Disk
- Windows Server 2019
- Automatic File Backup
- Steam Disk Write Error
- Speed up Windows 10
- File Record Segment Is Unreadable
- partition magic 8 server 2003
- partition magic 8 windows server 2003
- partition magic for 2003
- partition magic for windows 2000 server
- Partition magic for server 2000
- Partition magic for server 2003
- Partition magic for server 2008
- Partition magic server
- Partition magic server 2000
Low Disk Space Warning
Question: I’ve got low disk space messages so I had erased everything I don’t really need on C. So I have now like 500 MB free space on C. Everything I download, I put on drive D, but even though the programs and stuff I download to D are truly there, on drive D, C drive is mysteriously loosing free space and D doesn’t. I really don’t understand this, what should I do then?
(From: askbobrankin.com)
When you search “low disk space warning” or “low disk space message” on internet, you will get a lot of similar questions like the upper situation. Windows has its own warning modes. Low disk space notification is one of them. With the decrease of available disk space, the warning will be more and more disgusting. Windows will warn you once you start the computer, if the available space is less than 200MB; Windows will pop-up the warning every four hours when the available space is less than 80MB, but the warning frequency will be once per 5 minutes if the available space is less than 50MB. When users get the similar warning like “You are running out of disk space on Local Disk (C:). To free space on this drive by deleting old or unnecessary files, click here”, it’s time to do something to manage the disk.
Low disk space is a big trouble when user still needs space to store files. Especially when the system disk is almost running out of space, the computer may be working under very low speed. Even it will cause data damage or loss. To get more available space:
(1) Some users just delete the useless files, but this may cause system unbootable if they delete the system files by mistake. Or the new released limited space will be occupied soon by the buffer file just like the upper question said. So this method is meaningless or even worse.
(2) Enlarging partition is a good choice. But what should users do then? We do think extend partition software is necessary now. We recommend MiniTool Partition Wizard Free Edition (Download now), and users can enlarge the target partition by two ways.
Stop Low Disk Space Warning by Enlarging Partition
If there is unallocated space close to the target partition in the same disk, users can enlarge partition by resizing partition. Here are the steps:
Step 1. User should run MiniTool Partition Wizard Free Edition, and launch the application to enter the main interface as below:
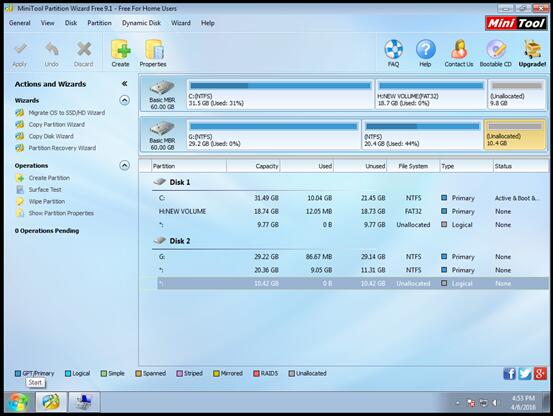
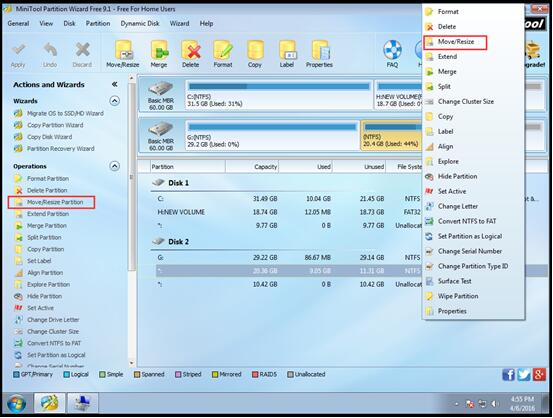
Step 2. Select the target partition which needs to be resized and choose “Move/Resize Partition” from the left panel or choose “Move/Resize” from the right-click menu.
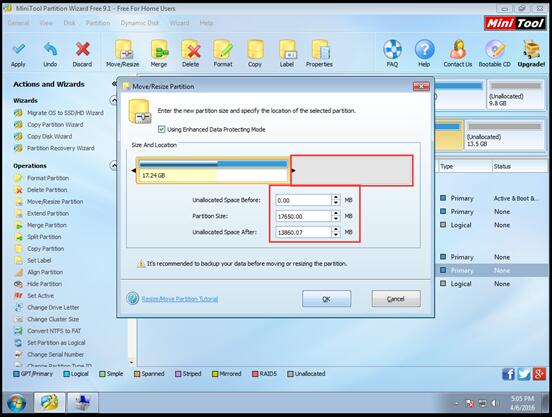
Step 3. In this interface, the grey sector indicates the unallocated space which can be used to enlarge the target partition by dragging the black arrow, or reset the parameters in the lower red frame. Then press “OK”.
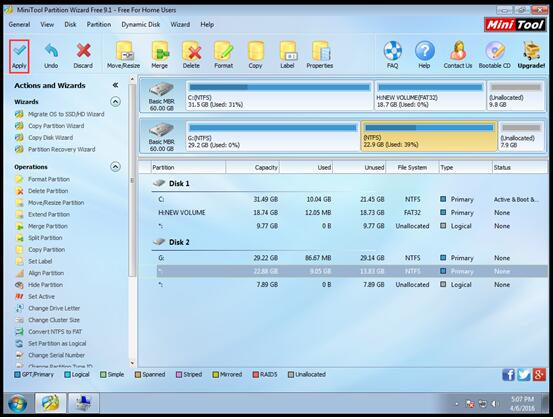
Step 4. Here, user can see the target partition is larger. Then click button “Apply” on the left top side to save changes.
While, if there is no contiguous unallocated space, user can use its “Extend Partition” function to extend target partition freely. This is the second way.
Stop Low Disk Space Warning by Extending Partition
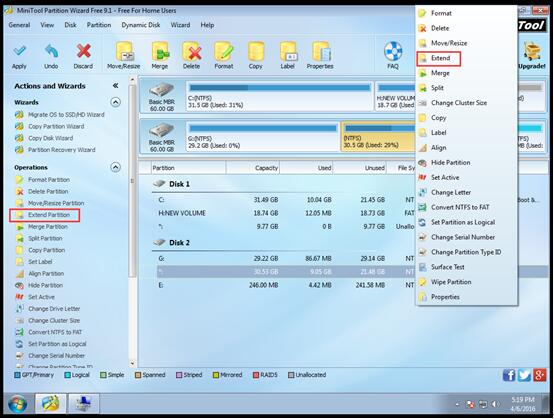
Step 1. After entering the main interface, select the target partition which needs to be extended and choose “Extend Partition” from the left panel or choose “Extend” from the right-click menu.
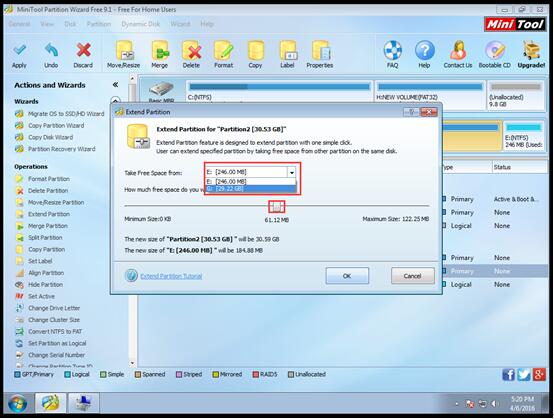
Step 2. Open the drop-down list of “Take Free Space from” and choose a partition or unallocated space to take free space. Move the sliding handle to change the needed space. After that, click “OK” to go back to the main interface:
Step 3. Click button “Apply” on the left top side to save changes.
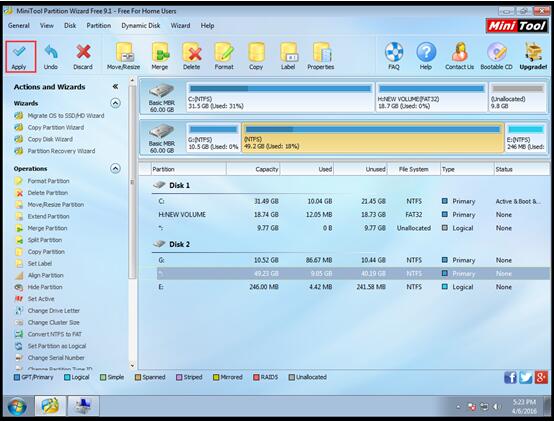
Of course, this method is available whether there is contiguous unallocated space or not.
 
Replacing the whole disk by a new big one is the third option once the entire hard disk is running out of space. If users want to do so, they can apply “Copy” function of MiniTool Partition Wizard Free Edition to copy all partitions and data of the target disk to the new larger one. And the copy can be used normally.
Stop Low Disk Space Warning by Copying Disk
Step 1. User should enter the main interface firstly. Then select the target disk and choose “Copy Disk” from the left panel, or “Copy” from the right-click menu or the tool bar.
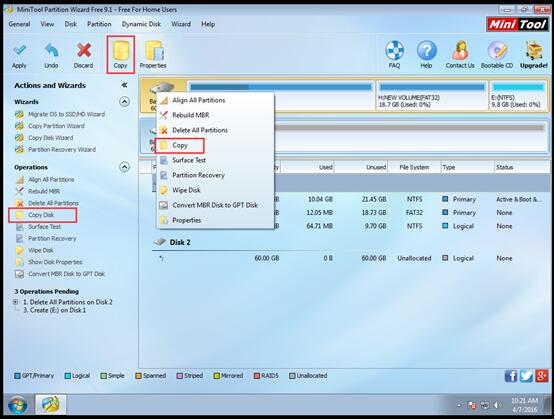
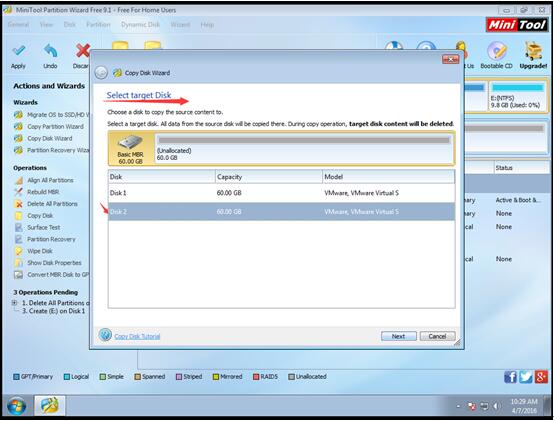
Step 2. This interface will allow user to select a disk to copy the source content. Select the new larger disk, and click “Next” to get to next interface.
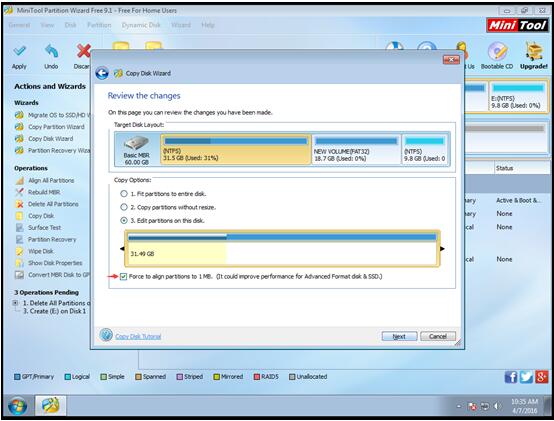
Step 3. In this interface, user should choose a copy option, and continue the operation by clicking “Next”.
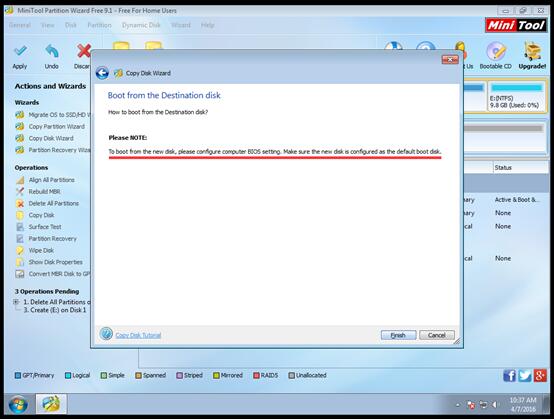
Step 4. Here, user will know how to boot from the Destination disk after reading the “NOTE”. And then, user should press the “Finish” button to go back to the main interface.
Step 5. Click “Apply” to save the copy.
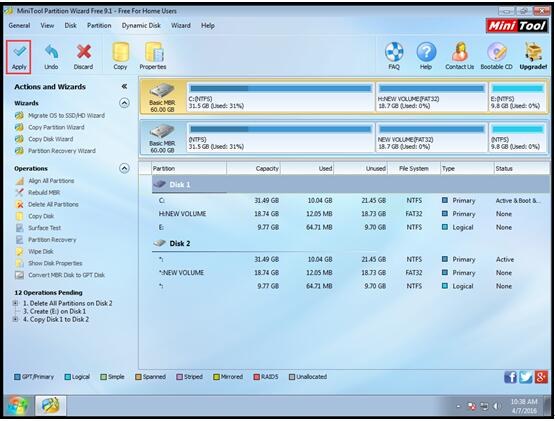
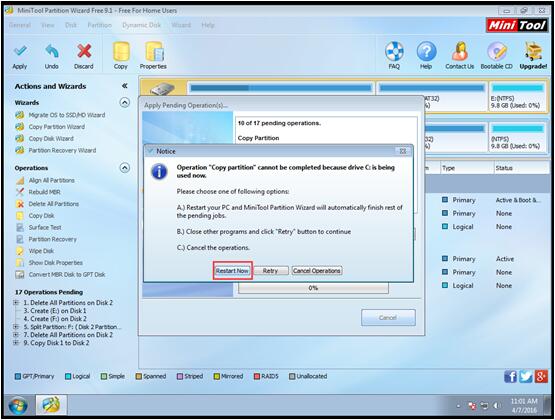
If users are copying the system disk, MiniTool Partition Wizard will inform them to restart computer. Just click “Restart Now”, and then MiniTool Partition Wizard will copy partitions and data to the new larger disk in boot mode. When all operations are finished, the computer will boot automatically. After then, the copy is completed.
If users want to know how to migrate OS to SSD/HD, MiniTool Partition Wizard Free Edition also can help you. More information, you can see Migrate OS to SSD/HD in our website.
Common problems related to partition magic and our solutions:
- How to Enlarge Windows System Partition without Data Loss
- Extend Partition in Windows Server by MiniTool Partition Wizard
- How to Extend Partition to Eliminate Low Disk Space Warning
- Question: Once when I’ve installed Win7, I’ve divided my HD to several partitions. Unfortunately I gave only 50 GB to drive C. Now I would like to extend it, but I can’t extend partition for extend volume is in grey. Is there anything I can do in order to extend partitions? (From: Windows SevenForums) […]
- Home
- |
- Buy Now
- |
- Download
- |
- Support
- |
- Contact us


